In this project/tutorial i planned to teach you how to measure the water quantity in tank using arduino water level sensor. As you know arduino water sensor can measure the amount of water its surface is exposed to(How it measure go through previous tutorial). So how can we use this information to measure the whole quantity of water in a given water holding body? Well the whole game revolves around mathematics. I will explain every thing in steps to make it easy for people who are not good in Mathematics.
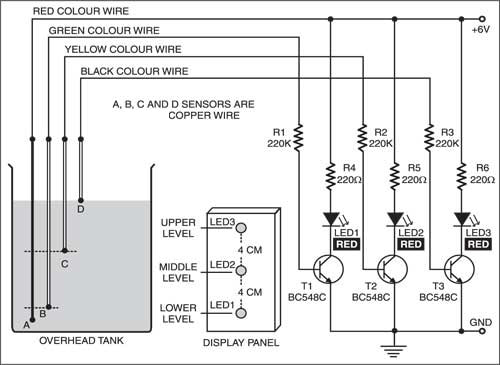
Tank water level monitor old techniques
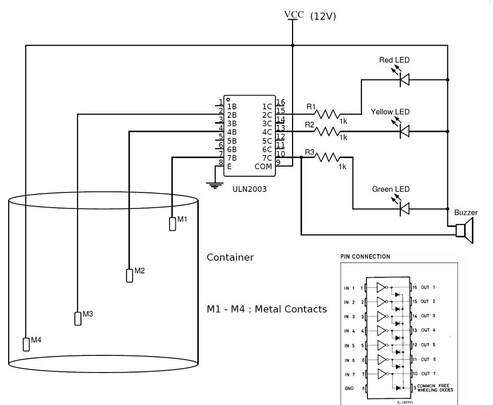
Considering the above copper wire sensors and transistors logic we can take many useful work from the system. For example if the water reaches the bottom of tank then switching on the water pump to refill the tank and if water reaches top switching off the motor. Activating an alarm if water touches dead or full level. See the below picture in which ULN2003 darlington pair ic of transistors is used instead of individual transistors. ULN2003 is a better choice it save space and time to purchase and build the circuit by hand.
Techniques to monitor quantity of water in a tank using Arduino uno
- Water quantity monitoring using copper wires
- Water quantity monitoring using Analog to Digital converter(Analog sensor usage)
Arduino water quantity monitoring using water level tank indicator and copper wires
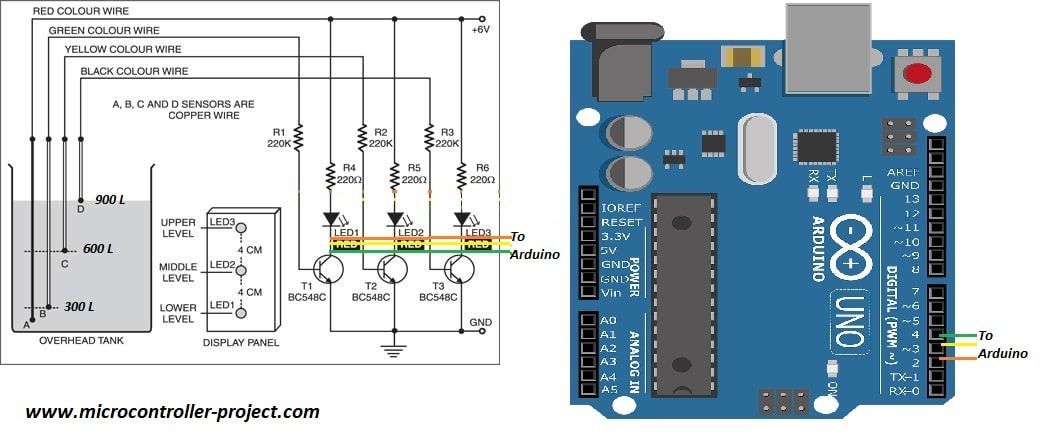
I am going to use the above circuit with three levels/heights. Copper wires are placed at heights with know quantity of water. The output transistor collector side is input to arduino. Three arduino pins are declared as inputs. Now when charged water touches the copper wire the particular led glows up and arduino reads it as a high input. Once arduino finds the particular pin status as high it prints the quantity of water on its serial monitor. Note: The quantity of water at all the three tank levels are known and hard coded in arduino code. Circuit diagram of the project is below.
Limitations in the above water quantity in tank monitoring
Monitoring water quantity in tank using ADC(Analog to digital converter) of Arduino
Rectangular/Square tank example
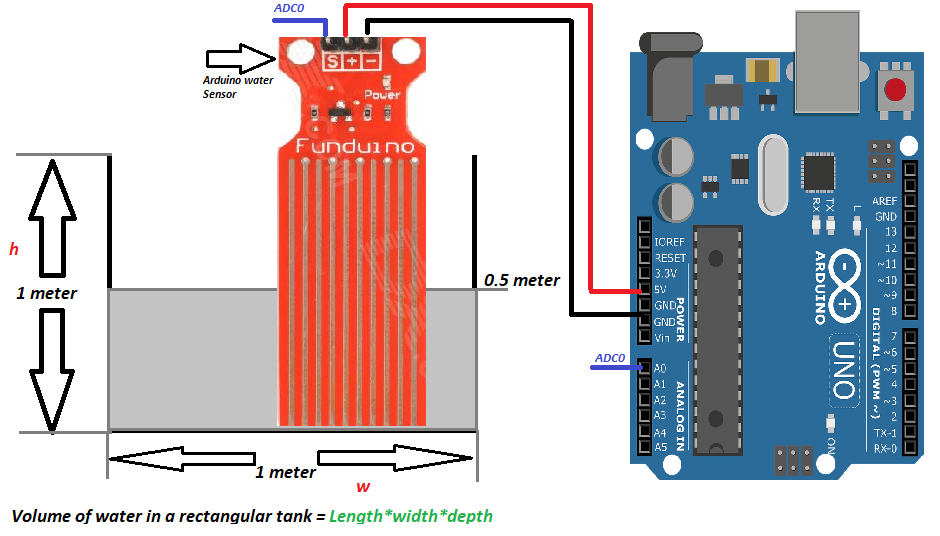
Formula to calculate the volume of water in a rectangular/square tank is given by length x height x depth.
Since in our case rectangle is a perfect square of 1 meter dimension so 1 x 1 x 1= 1 meter cube.
Now in case if it is half filled. We only need to change the depth variable which is now 1/2. Again calculating the volume of water in tank when it is half filled= 1 x 1 x 1/2 = 0.5 meter cube.
Now see the below diagram in which arduino water detector is placed in tank in vertical order. Recall that arduino water sensor gives an output which is proportional to the amount of water it is exposed to.
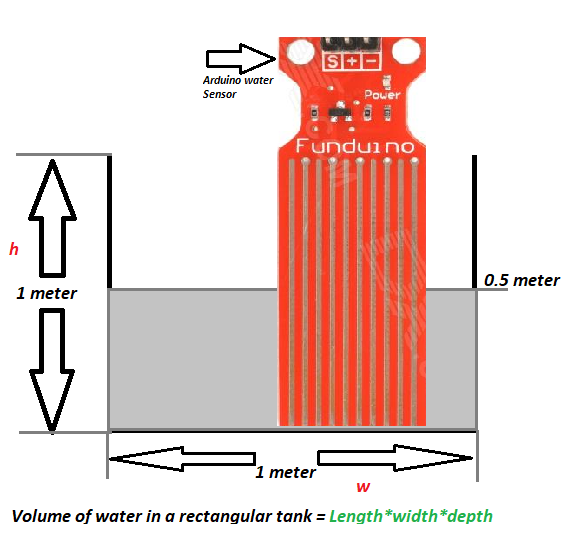
We know that our tank depth is 1 meter and our sensor is also 1 meter in height. Now we want to drive a relation ship between depth of tank and output of water sensor. We know when water reaches in mid of sensor, its output will be 2.5 volts or 512 in integer. Basically we are driving resolution of the water sensor vs the tank height.
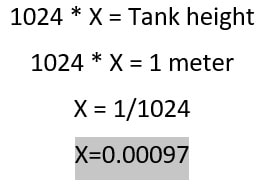
Most Important point:
Now if we take the above scenario in consideration. The water in tank is at height 0.5 meters. At this height the arduino water sensor reads and outputs 512. If we multiply arduino ADC reading(512) with the factor X we can get the volume of water in tank([512 * 0.00097]*1*1 =0.4964 meter cube). We get the correct result. So we can measure the quantity of water in tank with extreme precision using the above technique. Now no matter if the depth of water changes we will get the precise result in all cases we covered the whole range by calculating the X variable. Suppose water reaches 0.25 meters depth arduino will read it as 256. So ([256 * 0.00097]*1*1) = 0.2483 cubic meter
In whole of the above example main variable is X. Once you find the X for a particular tank. Rest of the thing is a piece of cake. Below is the circuit and code of the above project. See the project code how easy it is.
Steps in general to use the above technique
- Find the length, height, depth of tank. In cylinder find the radius.
- Calculate variable X using height, depth(discussed above).
- Calculate new height depth. Actually depth/height of water in tank.
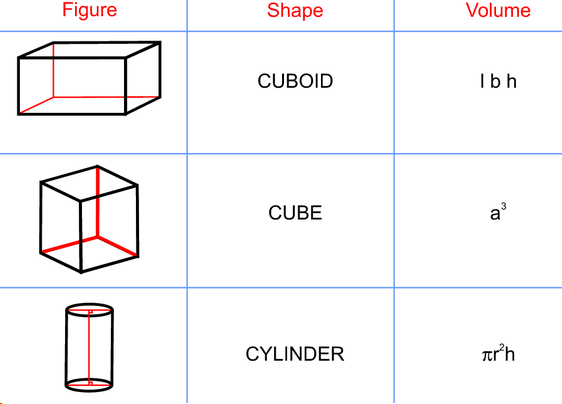
- Finally calculate volume using the formulas given in above diagram.
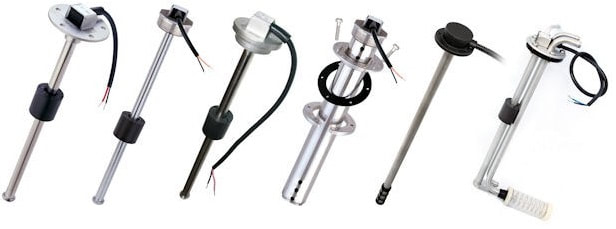
Limitations of the above technique
To overcome this problem commercial analog water monitoring sensors must be used. They are expensive but provide high precision output and their shelf life is also greater then cheap arduino sensors. Typical analog water sensors are shown in below image.
Filed Under: Arduino, Microcontroller Projects

Questions related to this article?
👉Ask and discuss on EDAboard.com and Electro-Tech-Online.com forums.
Tell Us What You Think!!
You must be logged in to post a comment.